
Purpose
To keep the COLE (Customer Outreach and Lead Engine) round robin scheduler accurate, each sales rep needs to share their personal calendar with the COLE service account. This article walks through exactly how to do that in Google Calendar.
Audience: Sales Team
Platform: Google Calendar
Owner: Athletics IT
Service Account: Provided to you separately via email
What This Access Is Used For
Before you get started, it's important to understand the scope of this access:
- The service account is used only to check your availability so COLE can avoid double booking you.
- It looks at your calendar to see when you are busy or free. It does not read the titles, descriptions, guests, or locations of your events.
- Its sole job is to route prospect meetings into open slots on your calendar based on your existing commitments and conflicts.
- This is not a general calendar integration and is not used for any purpose beyond scheduling logic.
Step-by-Step Instructions
- Go to calendar.google.com and sign in with your UMD account.
- On the left sidebar, find the My calendars section.
Locate the calendar listed under your full name (for example, "Jane Smith"). This is your personal calendar, not a shared or resource calendar. Do not use any other calendar in the list.
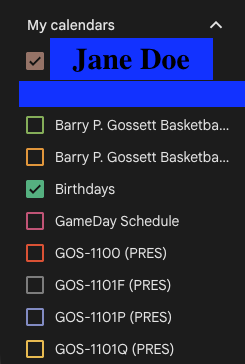
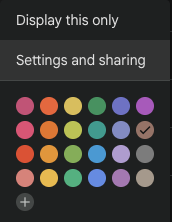
- Hover over your name until three vertical dots appear on the right side of your name, then click them to open the options menu.
From the menu, select Settings and sharing.
- On the settings page, scroll down to the section titled Share with specific people or groups.
Click Add people and groups.
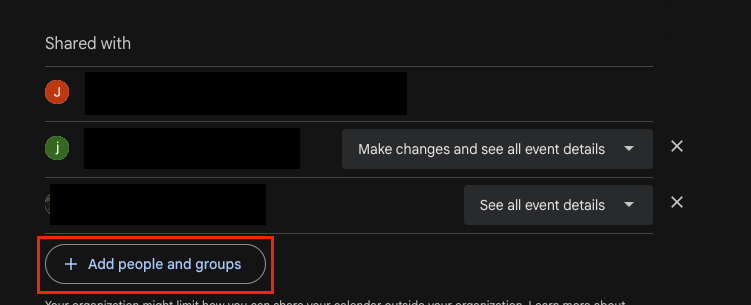
- In the field that appears, enter the COLE service account email address. This was sent to you directly via email. If you can't locate it, contact Athletics IT before proceeding rather than guessing at the address.
Use the permissions dropdown next to the email field and select: Make changes (see private events as free/busy)
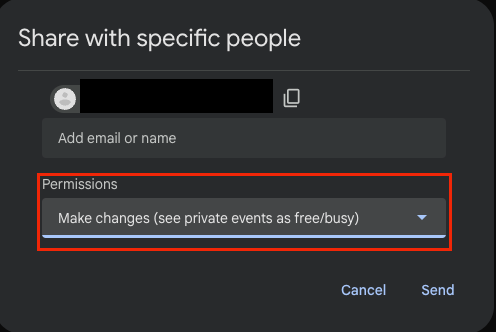
- Click Send.
That's it. Once the invite is sent, the service account is connected and COLE will begin factoring your calendar into its scheduling logic automatically. No further action is needed on your end.
A Note on Privacy
Selecting "Make changes (see private events as free/busy)" gives COLE the access it needs to place meetings directly onto your calendar. However, this does not mean every detail of your schedule is exposed:
- Any event on your calendar that you mark as Private (via that event's visibility setting) will only ever appear to the service account as a free/busy block. The title, description, and attendees of that event stay hidden.
- COLE is only reading your calendar to determine when you're already committed to something, so it can avoid scheduling a prospect meeting on top of it.
- If you have events you'd rather keep fully confidential, mark them as Private and they'll still block time appropriately without revealing any details.
FAQ
Q: Will this let the service account see my meeting details? A: No. It uses your calendar to determine availability only. Anything marked Private is shown to it strictly as busy, with no details visible.
Q: Do I need to do anything after sharing my calendar? A: No. Once shared, COLE syncs automatically and will start respecting your existing commitments right away.
Q: What if I accidentally share the wrong calendar? A: Go back into Settings and sharing for that calendar, find the COLE service account address under "Share with specific people or groups," and remove access. Then repeat the steps above on your correct personal calendar (the one listed under your full name).
Q: Who do I contact if I run into issues? A: Reach out to the Athletics IT team for support with this setup.